3bolt79
Moderator
- Joined
- Jun 28, 2024
- Messages
- 406
- Reaction score
- 799
Now that you have the guitar strung and tuned to pitch, it’s time to check the neck relief.
Put the Capo on at the first fret, and hold the Low E string down where the neck joins the body. This will typically be from the 17th to 19th fret.
While holding the fret down at the 17th to 19th fret, with the Capo on at the first fret, slide the business card between the string and the 6th fret. If it slides in easily, making contact with the fret and the bottom of the string, you’re good. If it doesn’t, you will need to put a little more relief in the neck.
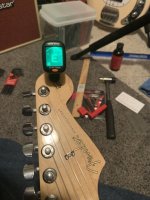
Looking at the headstock, down the neck toward the bridge, insert the Allen Wrench and turn it no more that 1/4 turn to the left (Conter Clockwise). Recheck the relief as before with the Business card. If it slides in and touches the top of the fret and bottom of the string, you’re done with this step.
If when you check the relief, the business card has visible space between the business card and the top of the string, you may need to remove some relief from the neck. Do this by turning the truss rod nut 1/8 to 1/4 turn to the right (Clockwise).
The business card should touch the 6th fret and the bottom of the string when you insert it at the 6th fret.
Adjusting the bridge plate
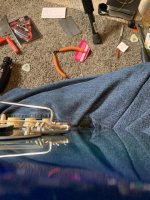
The bridge plate on a two point Fender trem should be raised a bit from the body, and level with the body or just slightly raised at the back. See pic below.

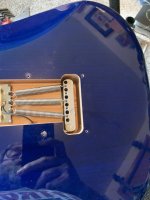
You can tilt the bridge plate using the Claw screws in the trem cavity. See pic.

Adjusting the action
Adjust the string heights to 4/64 on the High E, B, G and D strings to 4/64 at the 17th fret, and the A and Low E strings to 5 /64 at the 17th fret.
Adjusting the intonation
With the tuner on at the headstock and the guitar tuned to pitch, check the open, tuned string to the same note at the 12th fret.
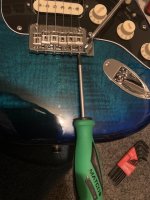
If the note reads flat (needle to the left on the display) move the saddle toward the nut by turning the screw to the left (Counterclockwise) and tune the string back up to pitch and recheck at the 12th fret, rinse and repeat until the open note and 12th fret note are the same with the needle in the tuner’s display in the middle.

If the 12th fret note reads sharp (needle to the right). Lengthen the string by moving the saddle toward the back of the bridge plate by turning the intonation screw to the right (Clockwise) and retune the string and check the 12th fret note to the open string again.

Once you’ve done this on all six strings, your’re done.
This is a basic set up. We aren’t discussing the nut because you would need special files that are expensive, and experience. The total cash outlay for the tools I’ve shown is about 30 dollars, depending on where you get the tools.
TEMU is a great source for most of these tools, and they are really inexpensive. From wire cutters to headstock tuners, the average cost per tool that I've shown is 3 to 5 dollars each.
We also haven't discussed a Fender Style six screw tremolo either. This can be a little tricky to adjust properly if you have no experience. I would refer you to videos by a guy named Frudua on YouTube on this subject or you can send me a private message if you have questions.
Put the Capo on at the first fret, and hold the Low E string down where the neck joins the body. This will typically be from the 17th to 19th fret.
While holding the fret down at the 17th to 19th fret, with the Capo on at the first fret, slide the business card between the string and the 6th fret. If it slides in easily, making contact with the fret and the bottom of the string, you’re good. If it doesn’t, you will need to put a little more relief in the neck.
Looking at the headstock, down the neck toward the bridge, insert the Allen Wrench and turn it no more that 1/4 turn to the left (Conter Clockwise). Recheck the relief as before with the Business card. If it slides in and touches the top of the fret and bottom of the string, you’re done with this step.
If when you check the relief, the business card has visible space between the business card and the top of the string, you may need to remove some relief from the neck. Do this by turning the truss rod nut 1/8 to 1/4 turn to the right (Clockwise).
The business card should touch the 6th fret and the bottom of the string when you insert it at the 6th fret.
Adjusting the bridge plate
The bridge plate on a two point Fender trem should be raised a bit from the body, and level with the body or just slightly raised at the back. See pic below.

You can tilt the bridge plate using the Claw screws in the trem cavity. See pic.

Adjusting the action
Adjust the string heights to 4/64 on the High E, B, G and D strings to 4/64 at the 17th fret, and the A and Low E strings to 5 /64 at the 17th fret.
Adjusting the intonation
With the tuner on at the headstock and the guitar tuned to pitch, check the open, tuned string to the same note at the 12th fret.
If the note reads flat (needle to the left on the display) move the saddle toward the nut by turning the screw to the left (Counterclockwise) and tune the string back up to pitch and recheck at the 12th fret, rinse and repeat until the open note and 12th fret note are the same with the needle in the tuner’s display in the middle.

If the 12th fret note reads sharp (needle to the right). Lengthen the string by moving the saddle toward the back of the bridge plate by turning the intonation screw to the right (Clockwise) and retune the string and check the 12th fret note to the open string again.

Once you’ve done this on all six strings, your’re done.
This is a basic set up. We aren’t discussing the nut because you would need special files that are expensive, and experience. The total cash outlay for the tools I’ve shown is about 30 dollars, depending on where you get the tools.
TEMU is a great source for most of these tools, and they are really inexpensive. From wire cutters to headstock tuners, the average cost per tool that I've shown is 3 to 5 dollars each.
We also haven't discussed a Fender Style six screw tremolo either. This can be a little tricky to adjust properly if you have no experience. I would refer you to videos by a guy named Frudua on YouTube on this subject or you can send me a private message if you have questions.
Last edited: