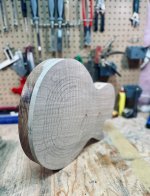
59' LP Build- "Vokey Burst" Build Thread

vokeyz

Member
Joined
Aug 25, 2024
Messages
34
Reaction score
75
Hey everyone,

I’m excited to bring a long-form thread to life about this 59’ build I’ve attempted. I build and sell a small volume of T-style guitars but this is my first LP that I’ve ever built.

Post index:

Post#1: (Material assembly, intro) Below:
Post#2: Body blank glue up, Neck blank rough out


Post#1:

This “59” project came about from a conversation I once had with my Dad when I first started really getting serious about building guitars 3 years ago. He said one day he’d love to see me build a full Les Paul from scratch, and at that time it felt way out of reach. I'm fortunate that I grew up with his love of guitar influencing me to the point that I build my own now, and play regularly in an amateur capacity with lots of awesome people, including him when I can fly in. (Pictured here with his R8 and me with his old 80's Carvin)

IMG_5965.JPG


Just before this last Christmas, my Dad retired and my mom and I had a covert conversation about what we were gonna do for his retirement gift/60th birthday. I told her I felt ready to ‘build’ him his “59” and we began putting the budget and timeline together. With a camping trip to British Columbia on the books to celebrate my dad’s first summer off (I’m based in Alberta and my family is in Quebec) the aim was to get this build done by then.

I started to do research, get templates, tools and jigs figured out. I began lurking here and reading through build threads to amass as much information I could along side the materials to build it. At the same time, doing my best to ask my dad critical questions about Les Pauls and his specific tastes without being obvious. We talk gear literally all the time so it was easy at first to inject it into conversation. I decided to get a pretty extensive template kit from Potvin Guitars for my template needs.

IMG_3642.jpg


I sourced some African mahogany from my wood supplier, and began drafting out templates and deciding how to go about everything to leave maximum impact visually.

IMG_4845.jpeg


Initially, I was taking aim at building a Les Paul custom. My dad had talked about getting a custom in lieu of an R9, but over time I figured out his real, unbridled holy grail was a 59’ Reissue, not a custom. He’s a Les Paul/Gibson guy, so I opted to change course and go all the way. I recognize a 2-piece blank isn’t historic spec, but decided to make do regardless. There will be more than one thing that’s “not quite” historic, but I’m ok with that. Unglued, freshly joined body blank:

IMG_4820.jpeg


Some ebony banks I was toying with from my inventory:

IMG_4844.jpeg


I sourced this 2" slab of figured “AA” eastern hard maple from a local exotic wood supplier, thinking it would be a more accurate representation of a vintage top, but I was wrong in that this top feels much more pronounced than the original late 50's tops I think. More on this later.

IMG_4960.jpeg


Early on, with the custom being the goal I had sourced some ebony for the fretboard, but with the build pivot I ended up with Indian rosewood. As hard as I tried, it simply didn’t make sense here in Canada to get ahold of Brazilian rosewood for the build.

IMG_5242.jpeg


Initially, I was going to mill the board myself, cut the frets and radius the board, the entire gambit (as I do with all my builds). My local and long-distance supplier were out for months- so I did order this as a “part” from stewmac, as much as would have liked to do it all myself like my other builds.

IMG_5008.jpeg


For now, that’s the end of post one…more to come!
 
With the wood sourced, selected and general course plotted, I began building. First I joined the 2 piece African mahogany blank. I decided to do this by hand for the practice. I have a jointer, and it’s an awesome one from the late 70’s, but for this I decided to go at it the old fashioned way. I needed to sharpen the blades on it as well, pic honing the blades:

image0.jpeg


With the body joined, I got the thickness flat. To my surprise, due to some wain, the blank ended up on the thinner side, but not out to lunch. African mahogany can be great work with, but I did have some small issues with sappy pockets, which will show to some degree in the end. I like the character it adds, but some who are looking for a pristine back may not like any splotchiness in the grain. It can lead to issues down the way as well, depending on where the pockets are specifically.

image2.jpeg


From the block of African mahogany I was able to rough out 2 neck blanks. I checked the angle and got 16.9 and 16.7 degrees respectively. For glue up, I decided to use some modern hide glue. There’s not a real benefit to doing the back this way, but knowing my dad, this was what he would think is cool. My joint was seamless, so most wood glues would have been fine. Titebond “hide glue” it is.

image1.jpeg


I wiped what I could off, ahead of sending it through the drum sander again for clean up. Post #3 coming soon!
 
Post #3

With the body glued up, it was time for me to get to milling the top.
IMG_4961.jpg

This top showed signs of the exact thing my dad looks for when judging a top. He likes inconsistent grain patterns, a bit of a blend between curly and flame. This slab was labeled "AA" which I could see somewhat, but the figuring really caught my eye overall.

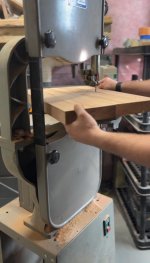
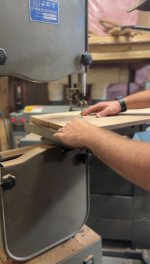
My Jet bandsaw doesn't have the tallest cut, but it works just barely for this kinda resaw work. I use a pretty meaty 3/4 blade and it serves the purpose quite well.

IMG_4998.JPG


IMG_6028.jpg


I don't have a bandsaw fence, which means I eyeball my cuts like this. You'd think 2" would give you ample room for a top!

IMG_6027.jpg


Planing takes a good 1/4" off when it's all said an done, leaving me a top around .650" thick. And, that looks quite promising!

IMG_4996.jpg


From here, I joined the sides by hand, using my 24" level as a sanding beam.

IMG_5010.JPG


I do have a jointer, but find that for tops, I get my best joints when going by hand with a level/beam. Once I get the joint glued up (Check out the video above!) I'm left with this:

IMG_5034.jpg


IMG_5035.jpg


IMG_5039.JPG


More to come..Stay tuned!
 
Post #4

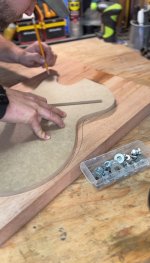
With the body and top blanks glued up, it was time to move into some shape work. Using a template, I traced where I wanted the overall orientation of the guitar to be.

image0.jpeg

I used the old washer trick to space my pencil off the template a bit, so I can focus on cutting the line on the band saw.

image1.jpeg

My jet bandsaw is the kind of tool that just seems to work. Proceeding further, I did the same with the glued top.

image2.jpeg

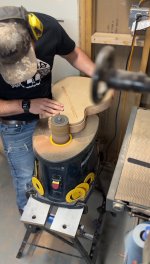
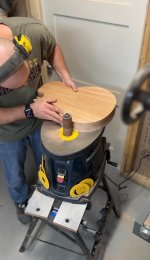
With the rough shapes cut, I used some double sided tape to stick the first template in the build process to the rough cut mahogany. This template is used to cut the control channel for the pick up toggle switch. I use it as well to establish the exterior outline of the guitar. Instead of going straight to the router table, I removed the majority of material on a spindle sander. This feels counter intuitive, but I've found this prevents a lot of the potential tear out that comes with table routing climb cuts etc.

image3.jpeg

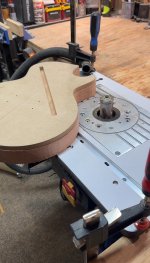
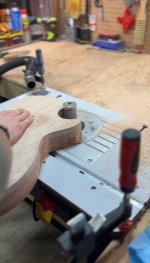
I have a pretty cheap table router, but it's set up well and I used an Infinity Mega Fush router bit for this step. These are huge- and they do an amazing job. I'm also certain they make excellent hand-burger.

image4.jpeg

A tool that sees very little rest in my shop is the Bosch Colt Router. This puppy is incredibly useful. Here I simply chop out the wiring channel ahead of gluing the top on.

image6.jpeg

To glue the maple to the mahogany, I did use standard wood glue. I thought about using hide glue, but in case there was every a neck reset I felt there could be some implications to having several hide glue joints close to each other.

image1.jpeg

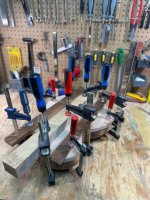
It takes a lot of clamps to make me feel comfortable during this part of a build, so I go with more is more here.

image7.jpeg

Before hitting the table router again, I sanded in the top closer to the established body outline.

image8.jpeg

All in all, I feel these agressive router bits are safer than smaller and more heat-susceptible ones. They cut like crazy, and as long as I stay awake this always goes well.

image0.jpeg

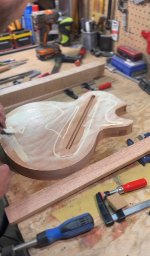
With some work, we have a nicely glued Les Paul type shape. For fun, I marked the topgraphic top lines to visualize some things. Post 5 incoming!
 
Post #5 - Cavity Routing and Top Routing

This part is tedious for me, because it feels the least artistic. With that said, it's important to find reason to stay focused because a wrong move hear can mean disaster!

image0.jpeg


I use a 3/4" Forstner bit in my drill press to hog out some bulk material to help ease the wear and tear on my router bits.

image1.jpeg


Once again, I clean up the cavity and remove the rest with my Colt router. I use a 3/4" deep 3/8" wide patter cutter, dual flute for this job. The vacuum attachment is highly recommended- otherwise I'm stopping all the time to clean up!


image2.jpeg


Before I get into routing the carve, I did a nice and small round-over pass on the back. I used a 3/8" radius on the short side, and I'll clean up any abrupt shift with sanding later.

image3.jpeg


Many experienced luthiers seeing my chosen method for this as foolishness, and in larger part, I don't recommend this. Teetering the router with very minimal surface area on the most expensive piece of wood for the project isn't recommended. I felt I could get a better visual on the cutter if I chose to use this instead of a jig, and while I was right, my nerves were shot by the end of 8 templates.

image4.jpeg


The handy thing with the templates are the built in centerline and screw holes. it makes template swapping lighting quick, and there's no worrying about keeping the centerline true. After an hour of tension we have this:

image10.jpeg


With that step done, I moved into the neck angle routing, pickup plane routing, and routing out the neck and pickup slots. The templates I'm using have dedicated templates for each of these steps, making the process far more reasonable to care out for the first Les Paul timer.

image5.jpeg


With some clever shims and a neat angle finder, I can set my jig to the exact correct plane in relation to the back of the guitar. I made this jig myself, which incidentally seems to take almost more time than guitar building.

image6.jpeg


I opted for the 4.4 degree neck angle. I had heard often about components appearing "off" at shallower angles and while I don't have first hand experience building many of these, it seemed to be a consensus among many luthiers that this was the right one to choose. I came down to 1.3 or so for the pickup plane, which travels from the neck pickup to bridge pickup perfectly if the math maths correctly. For me it did.

image7.jpeg


From there, I routed the long tenon neck pocket with the body still seated in the jig.

image11.jpeg


More posts coming!
 
Thank you! I’ll post more soon. I see you’re located in Sutton. I grew up in Cowansville and spent a lot time in Sutton near my grandfather’s farm!
Small world ! Where was the farm ?
 
Post #6: Top shaping, routing and control cavity work

As a prerequisite before shaping the top, I opted to complete pickup routing.

image0.jpeg


With a narrow contact plane for the pickups themselves, i had to go very slow as to not "over bore" any of the edges. Gibson used a pin-routing machine back in the day, which is a pretty intense piece of machinery that helped to keep things relatively consistent and efficient. I do not have such (maybe one day!)

image1.jpeg


A clamp helps to secure the template and the body to my bench, helping me feel a little more secure as well!

image5.jpeg


A bit of a nerve-racking rout is the angled control cavity that the original 50's Les Paul's were equipped with. This allowed Gibson to use short pots, and knowing my Dad, this was the exact kind of thing he'd love to see. So I built another jig and away I went.

image7.jpeg


Having completed all the necessary routing on the body, I moved onto sanding and shaping the top. This template set provides for a "re-carve" at the base steps, which my Dad is not a fan of. He prefers a wider "deep dish" appearance. At this point he was already starting to suspect something was up- and I let him give me some feedback on the carve itself. I wouldn't say this carve is 59 spec, but it's very pretty nonetheless. I used a combination of mouse sander and rotary drill sanding to sand out the steps and transition the curves.

image2.jpeg


At first, the transition at the bottom step felt abrupt, and a few other areas needed attention as well (circled in blue)

image9.jpeg


With some effort I worked these transitions more and settled with this:

image10.jpeg


At this point I had to see the grain pop so I wet the top with some mineral spirits.

image3.jpeg


I loved what I was seeing.

image8.jpeg


Happy with the carve, I moved forwards and drilled out the control pot holes to test the fitment before continuing.

image4.jpeg


Inside pic of angled the control cavity:

image6.jpeg


For now, that's it for post 6. #7 coming soon!
 
Post #7: Binding

With the body carve complete and the routing done, I moved onto binding. Binding is a project in and of itself, and I had to build a jig for carve tops in order to do this correctly. I built a tower type jig with drawer slides and a rabbeting bit.

image0.jpeg


It works substantially well for this task. The hardest part of building this jig was shaping the "donut" that rides the top. I made it out of a few pieces of 1/2" birch plywood.

image1.jpeg


With everything tested and operational, I cut the binding channel.

image2.jpeg


It takes a lot of patience and careful, deliberate movements to cut a consistent channel. The finished channel needed a little tune up with a needle file, but overall I was very satisfied with how the binding was sitting into channel.

image3.jpeg


With the channel complete I glued the binding in. I used super glue for a few different reasons. Super glue is fast, and if you use thicker stuff, it helps to mitigate gapping a bit.

image5.jpeg


Something important to note with super glue; it fills pores as well. So over drip needs to be cleaned quickly, with an anticipation for additional sanding. Dye won't penetrate into drip areas, and so things must stay clean for later steps.

image6.jpeg


Once the glue dried, I used a boxcutter to trim the excess, and a small scraper to complete the job.

image7.jpeg


At this point I'll wait until final prep before doing the rest of the clean up. A final step I decided to catch here was drilling for the control jack. I simply use a hole saw to cut a hole. A steady hand does a good job, but if you arent careful this method can leave nasty ridges on the inside.

image4.jpeg


Next we move onto the neck! Stay tuned.
 
Post #8: Neck rough-in and tenon fitting

In an earlier post I roughed out the horizontal plane of the neck, keeping the fretboard side true as a reference. With enough material on the neck, I felt safe running the headstock face through the jointer to true the 17 degree angle. it ended up being 16.8 degrees which I was willing to live with.

Jointer safety: Soft spots, rough spots, and uneven areas can snag on the jointer outfeed table. This machine will keep cutting, and in this particular operation, you fingers are on the board for the duration of the cut. It's important to maintain even pressure, and to have your feed tables well waxed. With a tripple cutter head you can practice the movement several times before turning it on. The biggest take away is deliberate, careful force. I don't recommend running a jointer on anything thinner than 1/2" but that's me. Your mileage may vary.

image0.jpeg


With the headstock "trued" to the fretboard plane, I moved onto the truss rod fitment.

image1.jpeg


Part of this step is choosing the location of your centerline, which guides the process from here. I use a template for reference, and found my center line. Original late 50's Les Pauls have an angled truss rod route, which deepens slightly as it travels towards the headstock. This particular design aspect is tough to get right so I used some ash shims and use Stewmac's truss rod routing jig.

image2.jpeg


I took 4 passes to cut the slot. The first pass had some slight issues and migrated the template during the cut. On the proceeding passes I locked the template in with a few more clamps.

image3.jpeg


Once complete, I was left with this:

image14.jpeg


After a few double checks, I decided to rough out the neck shape.


image4.jpeg


Removing as much material as possible reduces a lot of the work on the router table. The infinity mega flush chop-off-your-finger bit does a flawless job, and leaves an incredible smooth surface.

image5.jpeg


With the outline routed into shape, I fixed the headstock template on and drilled the tuner locations. This will save me headaches later with alignment.

image6.jpeg


Tuner holes in, I routed the headstock. I was in a state of zen for this cut, as it required all my attention and focus. Paddles were bought after this experience, and I recommend them greatly.

image7.jpeg


With all the routing on the neck behind me, It was time to move into arguably one of the most critical points of neck building: Tenon fitment. A proper fit neck and tenon is crucial for a successful guitar build. I build a jig that holds the neck on the fretboard plane 90 degrees to a cutting area. The trick is to NOT cut it 90 degrees- but to then shim the neck to the proper angle that coincides with the neck plane angle. (4.4 degrees, or 85.6 degrees depending on how you're looking at the neck). I use a flexible drywall saw, though there's fancier saws made for this type of operation.

image8.jpeg


Once 3 cuts are made on 3 sides, I use various chisels to bring the cut in to it's final shape.

image11.jpeg


I start with coarser cuts, but remove slim pieces so I don't over do it.

image9.jpeg


I work from coarser cuts, to finer shaves and periodically check my work to see how things are fitting. Using a chisel is definitely one of my favorite parts in building a guitar, and I don't use them much- so I enjoy these moments.

image10.jpeg


Once I'm convinced the fit will go off without a problem on all 3 sides, I sit back and enjoy the view for a minute.

image12.jpeg


image13.jpeg


Post #9 Incoming, stay tuned!
 
Post #9 - Truss rod Install

With a large volume of wood work behind me, I moved into some of the finer bits of woodworking.

image7.jpeg


Cutting a truss rod access is not what I would call "easy" but with a decent jig is very attainable. I made my own version of Gil's truss rod access cutter that was a little smaller and slim. This has its pro's and cons, but it mounts fairly easy.

image5.jpeg


Essentially its a Squared up piece of ash mounted on a maple plate cut at 17 degrees, to follow the headstock angle and bore flat into the face of the truss rod.

image6.jpeg


A 3/4" Forstner dual blade style bit works well for this. I used a drill press to make sure that the bit was square to the face of the plate that cuts. With a guide hole cut, I then reversed the bit and used the 3/4" bit to cut the jig's inset.

image0.jpeg


Once I tested it out a few times, I cut the final access into the headstock itself and simply used a drill. The clearance is really close to the headstock, so I recommend to lengthen the maple portion of the jig for more protection. A word of caution: During the cut, I splintered one side of the access from advancing the drill to quickly. Deliberate, slow drill advance is definitely key. I shaped a piece of mahogany from an off-cut and glued it in. Once the headstock veneer is installed it wont be visible, even with the truss rod cover off. I will also mention here that how far you cut is critical to the amount of adjustment you give your truss rod. I recommend being able to get 2/3rds of the nut on before calling it. This allows a few turns before the rod pokes through the nut.

IMG_5380.JPG


With the access cut, I was ready to commit to installing the rod. I went with an old school rod because it's what Dad wanted for his build. On the builds I sell I use a 2-way rod exclusively. This guitar is Dad's though, and it's more important to me to build it the way he wants than what I think is best for long term activities. Later he mentioned it'll be my problem to fix once he's gone so I can't argue with that infallible logic. A strip of mahogany was paired down and thickness sanded until it fit the truss rod channel just right.

image1.jpeg


Once fit, I marked the excess and cut it on the band saw. This strip of wood places pressure on the truss rod and gives it a "back" to push into.

image2.jpeg


Dad's penchant for things that are "old school" influenced me to set the strip with hide glue.

image3.jpeg


Once placed, I clamped it in and called it a day.

image4.jpeg


Post #10 incoming!
 
This is a long one so buckle up!

As I indicated in the first post, I wound up using a pre radiused and pre slotted fingerboard for this guitar. At the time of building and assembling, no where close to me had Indian Rosewood available in the lengths I needed to build a board from scratch. I was dissapointed, because this is something I have the tooling to do, and enjoy proudly selling my own guitars with hand cut boards. In any case, what I found online were raw boards more than a completed board from stewmac. So I ended up with a stewmac IR board.

image0.jpeg


As with all things, Prep work is key. I checked to ensure this was 12" radius, and that the slots were where I needed them to be for fretting. Using a pre-made board like this increases the complexity of the build a bit, because often you would radius and cut slots on an already glued neck. Inlay work is slightly easier too, because you're working with a flat surface as opposed to curved surface. Ultimately though, I had a timeline I was sticking to and went with it.

First, I found the center of each inlay position.

image1.jpeg


A flexible rule is great for a curved board. Next, I found the exact centers of the celluloid inlay I was using. Digital Calipers are best for this. I dotted the centerlines with a fine point sharpie.

image2.jpeg


Once I progressed through all of the inlay pieces, I used a white pencil and lined each piece up to their center's and traced the approximate outline.

image15.jpeg


The outline serves as a guide for me to begin removing material with my dremel/routerbase combo.

image3.jpeg


I use a 1/4" flush cutter bit and stay far from the outline in my intial passes. As I cut, the router follows the curvature of the board, which isn't exactly ideal for precision cutting.

image4.jpeg


This step ultimately is about saving time. One can use chisels to remove the bulk as well, but I feel a bit more in control with the router at this point in my skills.

image5.jpeg


With the router work complete, I pull out my sharpest chisel and went to work. This is a slow but satisfying process. Similar to tenon fitting, this is a zen-style task. I really do love this part.

image6.jpeg


Slowly, to the sounds of Led Zeppelin in the shop, I advance inlay by inlay. I work in a press down and clean up fashion. Vertical strokes followed by horizontal ones to clean up.

image7.jpeg


I am able to get a very consistent cut with a narrow chisel. Rosewood like this is easy to work in this way, making a satisfying job that much more enjoyable.

image8.jpeg


Once I progress through the entirety of the board, I'll double check the fitment of each piece and see if there are any off center or off-square with the board/each other.

image9.jpeg


Inherent to inlay, regardless of by hand or by CNC, there is gapping that needs addressing. The easiest way to tackle this is to take wood of the same type and grind up some dust to fill with.

image10.jpeg


Tedious but necessary.

image11.jpeg


With alignment double checked, gaps filled with dust, we commit and glue the inlay into place.

image12.jpeg


Not unlike dyeing, it's important to keep glue where it needs to be. A glue spot can be very visible on a fretboard, so I avoid the use of accelerant entirely. I generally do a couple passes with glue (letting it dry in between) to avoid air pockets/voids around the inlay.

Once glue has dried off, its back to filing. This is a step that occurs as a result of using a pre radiused board. On a flat surface, you'd simply router the entirety of the board to its radius, including the inlay.

image13.jpeg


Once the inlay is paired down close, I'll use 220 git and a radius block and bring it in tight to the board, leaving me with a ready-to-glue Les Paul fingerboard:

image16.jpeg


The mineral spirits also give a preview of what's to come when the board gets oiled.

image17.jpeg


Thanks for bearing with me for this long post, but I felt it deserved the time to go through and share the process.

Lots more to come- stay tuned!
 
Post #11: Fretboard gluing, Binding Install and Frets

With the inlay complete, I glued the fretboard to the neck. I'll mention one good thing to note that I forgot about was removing the excess glue where the nut sits on the neck at the edge of the fretboard. It saves you a little work later.

image0.jpeg


A few radius block and some clamps make this an easy job. I was focused on lining up my center lines. I don't have a picture of it exactly but I did use a tooth pick through the board to line things up nicely.

image1.jpeg


After the glue cured I gave myself a little visual treat.

image9.jpeg


Next on the list of to do's was to get into the frets/neck binding. For this guy, I used the band saw to trim some of the excess. I didn't use a table router because I no longer had as flat reference point anywhere to use.

image2.jpeg


Once again, this is partially more complex than necessary because there is a curve I am working with. If the fretboard face was flat, I'd use a rabbeting bit for cutting the binding channel, and run it across the table. Instead, I used this handle little trimmer attachment for my router from stewmac. This functions like a rabbeting bit and uses the side profile of the neck outline as a guide, which was the only surface I could functionally use.

image3.jpeg


At the tenon, where I run out of outline for the trimming tool, I used a file and straight edges to get the outline right for where the binding will sit. This is a bit tedious, but it works.

image5.jpeg


From there I scraped the channel to be as square as possible, and used the fret rocker tool because it has a great 90 degree angle that's easy to control.

image4.jpeg


Once both sides were complete, I checked both channels with a piece of binding.

image6.jpeg


For frets, my Dad made a request that outside of typical for 59 ish builds. We used Dunlop 6100 nickel silver frets, as opposed to a more vintage spec fretwire. Because this build isn't trying to be an exact "Copy" but a replica for my Dad that feels right, I was happy to make little adjustments here and there.

image8.jpeg


These frets came pre radiused, but I often buy fretwire in bulk and like doing the radius to them myself. 12" Radius was ready to go!

I use a combination of the drill press and fretting hammer to install frets. I find the hammer mars the face more, but seats better than a drill press version because tables have flex, especially smaller drill press tables like mine. A dedicated press has been a tool I've been considering for quite some time.

image7.jpeg


With the channels cut, frets install, I trimmed the edges and filed them flush to the side of the board. I didn't get pics of this part but its about as straight forward as you can imagine. It is often tempting to speed that process up, and file aggressively, but I've found on other build to keep a steady and methodical pace- At this stage errant tool marks can show in the final product.

image10.jpeg


Some super glue and binding tape is all it takes. I used a thicker glue to reduce drips but still had a few I'll need to address.

image11.jpeg


All in all, it was starting to look like a Les Paul!
 
There is such a thing as binding tape ?
I should clarify- Not specifically. I call it binding tape, but really it's more of high-tack masking tape with a little sponginess to it. Stewmac markets it as brown binding tape. Here's a link to the stuff in the picture:

 
Post #12: Celluloid Side Dots

To prep for side dots, I cut the excess binding with a boxcutter. Slow process, but it's worth taking the time to do well. Too much removed and it will be seen in the finish product. I choose to shape around the fret end nib with a file (Instead of getting as close as possible with the box cutter blade).

image6.jpeg


Celluloid appears to be the material of choice for 50's style LP's. I chose to make things harder than usual and make my own. The most common Celluloid I have is guitar picks, and fender mediums happen to be my dad's favorite color, and while they could be more vibrant than what is typical for the era, we went with it (Pick of choice on the left).

image7.jpeg


I forget where I saw this, but it's a wonderful idea. I ordered a leather hole punch from Amazon. I was baffled at the cheap price and figured I didn't have much to lose if the cut was imperfect.

image8.jpeg


To my surprise, this worked very well. I have no idea what the longevity is, but one guitar pick has enough dots for two guitars, which makes the cost of the tool well worth any wear the tool may have over time.

image2.jpeg


Bagged and ready for later use. These are 2mm (Dad's 60!)

image1.jpeg


Returning my attention to the neck, I set up my side dot jig and indexed each hole. I got this acrylic template from Potvin Guitars, and use it on every build I do.

image3.jpeg


Carefully, I then widened those indexed holes to 2mm. From here it's as simple as glue and go, but I use a couple tooth picks to set the dots so I don't stick my digits together.

image4.jpeg


The finished look is certainly what I was hoping for.

image5.jpeg


That's all for this post!
 
Post #13: Neck Carving

Carving a neck is up there with inlay fitting. It's on the more romanticized side of building guitars. I choose to use rasps, files and scrapers of different kinds to shape my necks. I've been looking at spoke shaves, but that will be for another build.

The goal here was for a 59' carve, but as I've heard Joe Bonamassa say (and other than original builders there probably isn't anyone who has handled as many 59's as he has) the necks on these vary a significant amount guitar to guitar. A safe bet was to use StewMac's profile template and reference my Dad's R8 neck dimensions. This ended up around .02 to .03 thinner than his R8 when following the Stemac template.

image0.jpeg


When carving a neck, I always start with my Shinto. These are very aggressive files/rasps. Some call them box planes but a Shinto has a different nuance to it than a standard box plane. It ejects material well and I find makes short work of what could be a long task. I find my fret board reference marks and bring the thickness down to within 10 thousandths of an inch or so- according to the template.

image1.jpeg


Once my thickness is close, I begin to rough in the curvature.

image2.jpeg


The template will give you reference points that line up with specific frets. On the 3rd and 12th fret are my two main points of reference.

image3.jpeg


The 12th fret and heel carve work into each other, so I began work cleaning up this area after the 12th fret area was shaped.

image4.jpeg


With the heel shaped and two main points of reference cleaned up, I shifted gears and hogged out the majority of what was left, slowly connecting the two. As I get closer, I switch from the shinto to a half round file, and from that to a scraper to take material off more slowly and to isolate problem areas. A pencil is great at this point for keeping working areas shaded.

image5.jpeg


While a volute on a 1-piece neck would be ideal from a design characteristic, Dad knows what he wanted, and I shaped that transition as per typical. A box cutter blade is great for this part of the job.

After some double checks and some additional scraping, I'm left with this:


image6.jpeg


image8.jpeg


image9.jpeg
 
Post #14 - Fretwork

At this point it's time to dial in my fretwork. It's easier to do fretwork off the guitar, and as long as the neck pocket geometry is properly set, I haven't had issues doing my fretwork separate from the body.

I used to use radius blocks (seen earlier in the thread) for levelling the tops of the frets but have since been convinced to use a levelling beam instead. My 2 foot level with some 220 grit sandpaper is a great proxy tool, and I have had my best fret jobs levelling individual string "lies" vs making a perfect cylinder. Thanks Dan Erlewine.

image0.jpeg


From here I crown the frets. Because install went really well, I had extremely minor work to do for both the levelling portion and for crowning here. I had two or three frets that really needed work. Tape isn't necessarily the only way to protect the fretboard but I always feel better about doing things this way.

image1.jpeg


I like blue sharpie to keep track of the fret tops. I aim for a razor thin line while I work, and blue shows up better than black. I like red too.

image2.jpeg


Jumbo frets have more surface area to work, so in some ways it's a bit easier to get them to shape up well. The flip side to more surface area is a little more elbow grease to crown them properly.

image3.jpeg


I use 120 to rough shape, 220, 360, 400 in succession before polishing with a dremel. Before polishing though, these frets were looking mighty fine and could have been left alone.

image4.jpeg


I use Autosol polish for this step. It turns out great results. I've found less is more with this stuff, and prevents making a mess of the little shop.

image5.jpeg


Finally, I shape the fret end nibs with a dressing file. Once I remove the majority of the material I remove the tape and finish the dressing job completely.

image6.jpeg


image7.jpeg


From here, we get into the highly contentious topic of headstocks.
 
Back
Top